Ceramics Bust Sculpting: An Explosive Journey
Click on the buttons below to go directly to my blog posts:
Blog 1
|
Blog 2
|

Blog 3
|
Blog 4
|
Blog 5
|
Blog 6
|
This has been a challenging learning journey for me, with a lot of ups and downs. My first attempt, a flimsy head with good features, didn't even get off the ground, and totally collapsed quickly after I started. Motivated to find a way to make things work, I asked for some ideas from two sculptors who have experience with busts, and went back to the sculpting table.
As I was about to start my second attempt, I decided to look online for ideas on sculpting. I wanted to find a specific kind of video -- one that showed sculpting as a freeing activity rather than only worried about small details. I found this amazing video, by Philippe Faurat, where he does a great job fast-sculpting two heads. He also used the skeleton described by my colleagues, and I attempted to use the same method of skeleton, as described on my second blog. This did not work for me, probably because the wood was so thin, and so I went with a solid method instead.
As I was about to start my second attempt, I decided to look online for ideas on sculpting. I wanted to find a specific kind of video -- one that showed sculpting as a freeing activity rather than only worried about small details. I found this amazing video, by Philippe Faurat, where he does a great job fast-sculpting two heads. He also used the skeleton described by my colleagues, and I attempted to use the same method of skeleton, as described on my second blog. This did not work for me, probably because the wood was so thin, and so I went with a solid method instead.
|
|
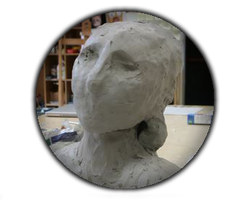
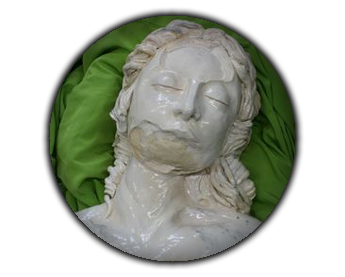
This video helped me grow a little more free with my sculpting methods; during my first attempt, I was very finicky, making the lips and nose even before I had a good shape for the head. If that bust had not collapsed, the results would have been very different than my final piece: the head was small and round, and the jawline was basically lost. My second bust looked much better (before firing :D ), and I am glad I did some research online. After finishing my process and getting most of the head done except for the hair, it was time to make the bust hollow somehow.
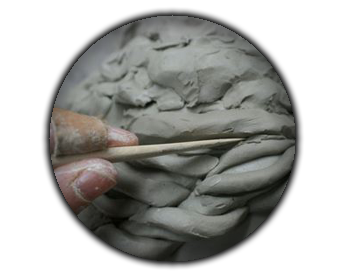
While looking for comprehensive instructions on how to carve a bust, I found this amazing video by Joanna Mozdzen on Youtube of how to hollow out a head. She gave a great step-by-step video on her techniques, and I felt inspired by her method of recording her methods It didn't show me what to do with the shoulders, so I ended up following my husband's suggestion and cutting the shoulders to carve from the sides.
While looking for comprehensive instructions on how to carve a bust, I found this amazing video by Joanna Mozdzen on Youtube of how to hollow out a head. She gave a great step-by-step video on her techniques, and I felt inspired by her method of recording her methods It didn't show me what to do with the shoulders, so I ended up following my husband's suggestion and cutting the shoulders to carve from the sides.
|
|
After the piece ended up exploding, I had to reassess my methods of testing for moisture, and so, I went hunting for more ideas. The information I got from Claygeek helped me understand where I went wrong this time around. For one, I should have done a test with paper instead of just touching the clay to my cheek, as the cheek test is not always accurate. The piece was very thick in parts, and putting some paper over it would have made clear it the clay was still moist as the paper would have wrinkled after some time.
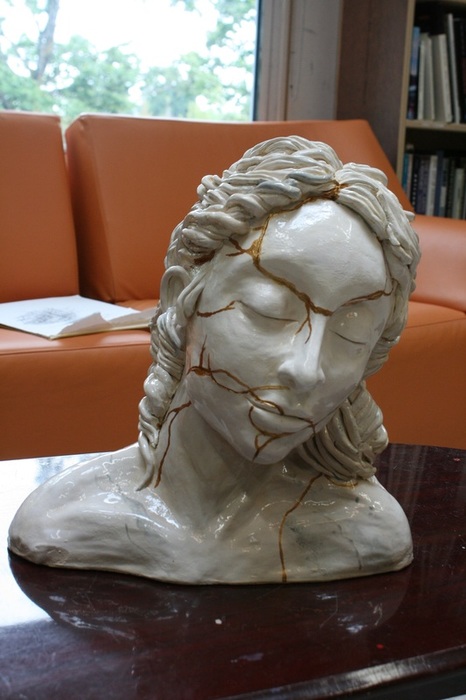
Finally, I had the epiphany of transforming my bust into something different altogether by using an ancient Japanese technique called Kintsugi. In Japan, when a vase or a piece of ceramics broke, instead of throwing it away or trying to conceal the cracks, the artists make the cracks more prominent by adding gold to the seams. Their philosophy is that something that is broken is not less valuable, but actually worth more than a regullar piece, because now it carries a story behind, and much more character.
I liked the idea of honouring my statue's history, and so I proceeded to put her pieces together and cover the cracks with golden acrylic paint. I am very pleased with the results, and feel like the bust is not even more interesting and meaningful than if it had never exploded at all. I may add more acrylic paint to some areas next week, but I want to let the overall look of the statue settle in my mind before attempting to add any more to it.
I am thankful for the opportunity to work on this project, as it was the first time someone asked me to document my process of learning. Having a meaningful audience is something that always helps our own students, and this project gave me the opportunity to experience having an audience for my journey as well. This kept me much more tuned in to what makes a good process description, how much is enough information, and how many photos make the steps clear. All these points are crucial when trying to create open resources for education that are of high quality and that will actually help people as well as start an actual conversation.
Looking back at my documentation of my first Sparks mural here, I remember how happy I was with the result, and how I thought any teacher could now follow those steps and produce a mural just like I did. I was so wrong! There are so many gaps on the process, you could drive a train straight through. Important parts need videos just as much as photos, which is something I noticed watching the video about carving the bust. It's not professional in any way, but it is a great start for future documentations. I feel like I need to do another mural project really soon, so I can better document the process and share it with my peers.
This process also showed me how important it is to have a blog instead of just a static page. My previous attempts were done on static pages only; I had a "contact me" page but that's the opposite of social media. A blog invites conversation and discussion and the sharing of ideas; I was a lousy participant in this class, although I read many of the blogs, but I saw the positive impact that having someone else comment on my blog, cheer for me and encourage me, had on my ability to continue trying to succeed.
I really liked being able to choose something that I cared about, and that helped me get through these past weeks. I found myself really looking forward to my spare time after class, where I could just sit down and figure something out. Imagine! If every teacher takes the time to learn one crazy thing every six months, and documents this process, what a rich experience this would bring to the teacher, and what a wonderful resource this would create.
Finally, all of this opened my eyes on what open education really means. It is not a one-sided thing as I once thought; it is about putting something out there, but allowing for dialogue, so that I can grow as well as the audience. It also opened my eyes that a resource doesn't have to be always proper, polished and 100% successful to be valuable. I have a history of cherry-picking projects and only sharing the ones which work; I thought I was helping put out things that will only help people. But sometimes, when a project doesn't work, and you find a fun workaround, this can help a person on a similar situation even more. Documenting is about growth, and errors and detours are part of this process. I hope I continue to document my process, but this time with a more informed view of what is valuable.
Sometimes, the cracked resource brings even more than something glossy and perfect.
